




Photobucket
Showing posts with label kids crafts. Show all posts

Tuesday, September 11, 2012

Bring on the bling - Pretty up your bike!

Hello - I am super excited to share this fun little project with you today, maybe because I love all things girly and sparkly or maybe because I became super mom when my daughter saw this.  She jumped up and down with joy and is praying that the weather holds up so she can ride it as soon as she comes home from school.


So this isn't originally my idea, my sister had done something similar to her daughters bike, removing some girly stickers and personalizing it for a not so girly girl.  Hers turned out darling, so of course, like with all good ideas, its worth stealing the idea and making it your own.

My daughters bike wasn't terrible, in fact we just bought it for her.  She loved it because it was purple, and after we added the basket, it was perfect.  But the stickers on it, for me, well it was a little much.  So we sat and pealed them all of, surprisingly they came of easy.  So I got to work with a little sparkly vinyl and my silhouette cameo.

I used Lori Whitlocks files for the heart, flower and border.  We also had to name the bike, so the purp-cycle it became.  Her bike also had the foam and vinyl cover over the handle bars that i turned inside out and added "I heart my bike" to it.


While i put the vinyl on, I found that it was easier to use a more delicate border, only because it was a little easier to bend with the curvature of the bike frame.  It was a little challenging applying it, but I think the more loose and loopy the flowers and the loopy border, just helped that it was a little free fitting on the frame.  I loved how it turned out, and most importantly my daughter did too.  I just might be doing little sisters and her big brothers... (he is still thinking of the perfect name for his bike.)

Just think of all those scooters and bikes in the world that could be made over... birthday, Christmas gifts perhaps?





Thursday, July 5, 2012

Bleach T-shirt Tutorial

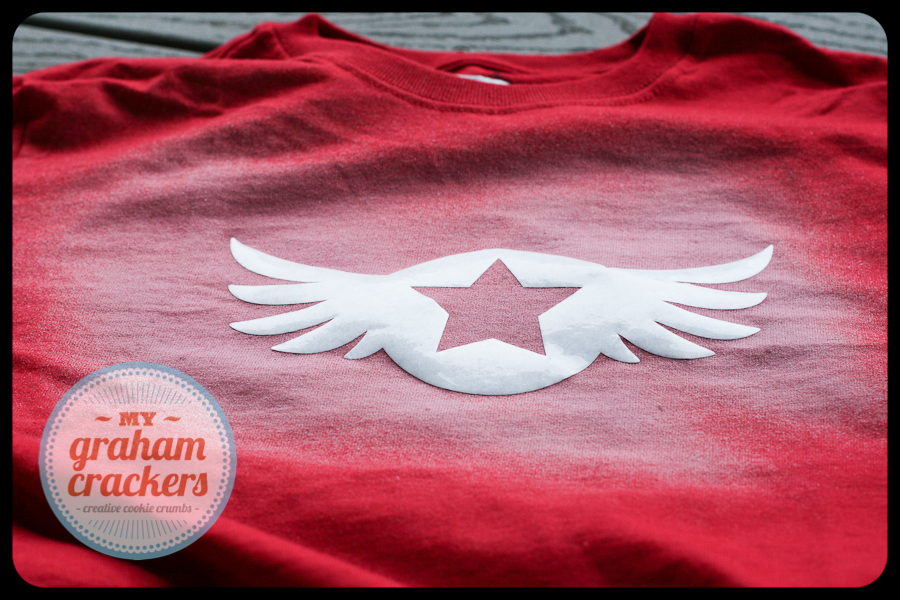
Hello Summer!  I wanted to share with you a fun summer project that takes less than 20 minutes to make.  I made some earlier this summer for my oldest son and a gift for my cute neice for her birthday.  But they were so fun and easy (and cheap to boot!) that I had to make a second round.  Using die cut shapes just made it easier!  Let me walk you through the project....


First you need a couple plain t-shirts, I just grabbed some at my local Walmart - and they were 3.47 each - can't get any better than that!  Then pick your favorite die cut file what ever you want on your shirt. (I made my oldest some that said his lacrosse team on it, so it doesn't have to be a shape, just use your imagination!)


You'll want to die cut it out of freezer paper.  On my cameo I cut it out using the vellum setting, since it was kind of delicate.  Be careful when you peal the excess away, it can tear easy.  Once you have them cut, use your iron and iron them on to your shirt like so....


Then comes the fun part.  Take your project outside, unless you like the smell of bleach in your house.  I found this little spray bottle in the travel section at the grocery section.  I filled it with straight bleach.  Take your shirts and place a plastic grocery sack in between the the layers so the bleach doesn't bleed through.  Take your bleach and gently spray the area you want to fade out.  I like to just bleach around the shape, but you could have some fun with it.  Be careful not to spray to much, or it gets absorbed into the freezer paper and then it bleeds though.  It's fun to watch because the bleach works fast.


After about five minutes, the bleach will dry fast outside.  Then carefully pull away the freezer paper.


Then toss them in to the dryer to make sure it gets dried completely.  And there ya go, some fun shirts any kid (or grown-up) would be proud to wear!


All my files I used were from LoriWhitlock.com from these collections


Thursday, December 8, 2011

Last Minute Gifts - Christmas Candy Pouches


Hello - Welcome to Lori Whitlock and Kerri Bradford Blog Party!  I am excited to share with you this fun project that I came up with.  I was trying to think of who was left on my list to figure out what to give and I  was reminded from my kids that they wanted to give something to their friends from school and church!  So I had seen something like this and thought, it would be much cuter with something die cut, and not to mention easier - so here are my Candy gift pouches.

This set of "cookies" was made with plain brown paper wrapping paper I picked up at the dollar store. I cut two bases with my cricut, then started sewing them around.  When you are about three quarters around - stuff the candy inside, then continue sewing until it is all sewn around - then I add the cute decorations all made from pattern paper.  I made this a set of four, since it is a gift for a cute family we know that has four kids - it will be from my kids to them.  So I wrapped them up together with string and added a tag.


I also made some of these cute presents as well - my daughter is begging for them to give to her friends at school.....  just tear right into them to find the secret stash of treats - ummmm.


Supplies I used:

Kraft wrapping paper (it was lots thinner than card stock which will help make it easier to tear into them!)
Christmas wrapping paper
Christmas Cookie set from LoriWhitlock.com
Christmas icon set from Lori Whitlock found on silhouette's online store
Christmas Countdown from KerriBradford.com

*** Don't forget to check out both ladies blogs each day this week for some fantastic give aways and discounts!

Related Posts Plugin for WordPress, Blogger...