Photobucket
Showing posts with label die cut. Show all posts

Monday, February 17, 2014

Bottle Heart Card - Thank you.... and a winner of the Gift Card

We have a winner of last week's blog hop!!!  My favorite Valentine treat is sugar cookies.... especially ones that sweet neighbors bring every year.... which is what I may or may not have had for lunch today....


I had only one guess it... so congrats to Carla.... she is the winner of the $10 gift card to Lori Whitlock's store!  Whoohoo!!!! Some one will contact you shortly with the details on your card.... Thanks to all who entered!!!!

Today's project is a thank you card.  I saw this in Lori's store and knew I need to make it.  It was darling.  I made it with Lori's Reflections collections from Echo Park found here.  The card file is found in her store, here.    I love these card files, they are super easy to put together, and they make such darling cards that everyone loves.  I dressed this one up with some stitching, twine and a thank you sticker.  Perfect for that someone that needs a thank you!


Thanks for stopping by....

Monday, December 16, 2013

Christmas Boxes

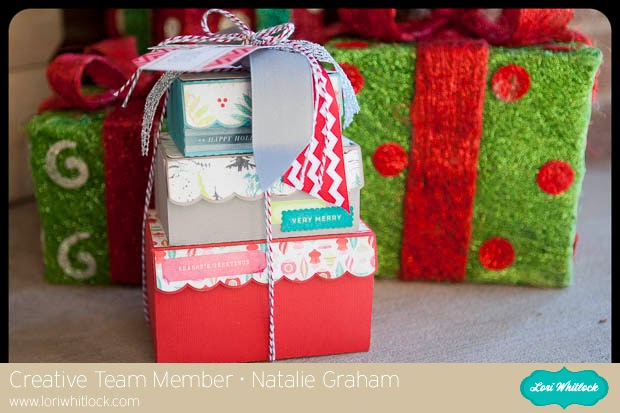
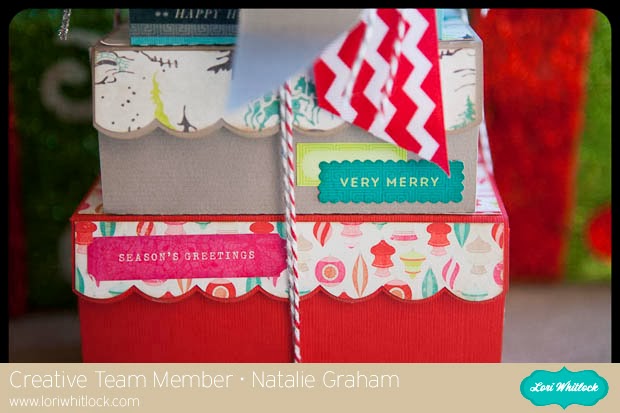
As it gets closer to Christmas, we get closer to thinking more about how we are going to wrap the gifts we are giving rather than what we are shopping for.  When I saw these boxes in Lori's shop I knew that it would be the perfect holders for a gift we are giving some of my family.  It's a three part gift, so the three boxes were the ideal solution to wrap up this gift. Most of the things going inside are small like gift cards and treats, so these worked out great.


I used the 3 Stacking Christmas Boxes found in Lori's shop here. I cut them out with various Christmas paper and card stock.  After assembling I tied them with some bakers string added some ribbon and tags and they are ready to go.

Hope you all have a wonderful Christmas and holiday season!

Monday, November 4, 2013

Christmas Card Blog Hop

 Welcome to Lori's Christmas Card Blog Hop!

Here is the order of the Hop…

Paper Gals

Natalie Graham *** you are here***


Digital Gals


I can't believe it's getting to be close to Christmas. I have already broken out and snuck in some Christmas music, til my kids caught me and made me change it.  But I love Christmas, I love everything about it.  So when the this blog hop turned Christmas  themed, I was giddy to break out some Christmas paper!


I usually do my Christmas Cards digitally because I like to get them printed and not have to hand make so many.  So for this hop I thought it would be fun to make a mini album to store all the cards that I get from my friends and family.  It also would be a fun place to put all your own cards in year after year.  Either way, its a fun way to keep the memories.


I used Lori's new Christmas line from Echo Park, called Reflections Christmas.  I also used her Tabbed Mini Album svg file found here. I cut the album pages from card stock, and added the stickers and embellishments that came with the line.

Then I added last years cards that I saved, and still have room for this years plus more!


So here's the best part, Lori is giving away THREE $10 gift cards to her SVG shop, and also having a sale too!


Good Luck and thanks for stopping in….

Next stop Traci Penrod 

Monday, October 21, 2013

Not So Spooky Haunted House

Hello again, I have a little project today on Lori Whitlock's blog that I want to share with you.  This box is super cute and I couldn't wait to make it.


It was easy to make.  I used the Haunted House file found in Lori's shop found here.  I cut it out of all the different colors.  I ran the purple roof through my Sizzix Texture Boutique to add some dimension to it. I put it all together using foam adhesive to add more depth.  Added some embellishments and added some sweet treats.  Perfect for sharing with a friend or neighbor.


Happy Halloween!

Tuesday, March 5, 2013

Spring is here - Easter Shadow box

Hello everyone, I am starting to think spring might be around the corner.  We had a glorious weekend here, and we are actually starting to see patches of grass around.  So I guess that means it is ok to start decorating for spring.  I love spring, I love the flowers it brings and the colors of all the decorations.  So I decided to make a cute little shadow box with this cute little bunny I found in Lori's shop.

To make this, I used Lori's 5x7 shadow box frame found here, which also includes a tutorial with it, that came in handy when assembling it.  I also used her bunny silhouette found here, and her Hello Summer collection from Echo Park.

Once the frame was all built, I added the bunny with a little foam adhesive and added a little cotton to the tale.  I think it turned out great, clean and simple and ready to make my house happy with spring!


Thanks for stopping in, see you next week!

Tuesday, February 19, 2013

Ruffled fabric flowers

I'm excited to share with you this cute little project. I would bet you would have never bet that this was made from my silhouette?  When I saw the rolled flowers in Lori's shop I knew that I wanted to try them out of fabric, and they worked.  The key is to use either stiff fabric with some stabilizer under it or, use this thin fabric to cut from.  The fabric I chose was thin polyester lining.  It's used to line skirts or dresses with out adding a lot of bulk.  I came in an array of colors, and it was super cheap.  I cut the fabric 12x12 to fit on my cutting mat, then cut out the shape with my silhouette.  There were a few places that didn't cut all the way through, which I hand trimmed, which is OK because these are not suppose to be perfect.  After I cut them, I grabbed my lighter and singed the edges, making them pucker and curl.  Then I got a needle and thread and had sewed the curls into place, then attached the rhinestone button.  Then hot glued a clip and some felt to clean it up.  Now I have some cute little flowers for my girls hair.  I think they turned out darling, now only if I had the time to make about 100 more!

The file I used was from Lori's shop and you can find it here.


Thanks for stopping by, let me know if you have any questions on how to make them!

Tuesday, February 12, 2013

quick and easy Valentine pillow

Well, I have a quick and easy project for you today.  I kind of have this thing for changing out my pillows for the different holidays.  I just have three pillow forms I picked up at Hobby Lobby last fall, and have been making slip covers for every holiday since.  So Valentine's in no exception, however, I couldn't find any cute Valentine fabric I liked enough to stare at for a whole month.  So last time I was at Hobby Lobby, I ran across these fabrics, and as much as they are cute, they are not very holidayish (is that even a word?)  So I took it upon my self to fix that.  I grabbed some iron on vinyl from my stash, and a cute file from Lori's shop, and now the set looks the part.

I simply made three pillow cases, but the one that was white I stitched with some red tread to make it a little more fun.  Then I cut out the heart, and ironed it on.  I love quick projects like this, but they look pretty fancy still.

The file I used was from Lori's shop called 3 hearts and you can find it here.


Tuesday, January 15, 2013

Love Notes

Happy Tuesday everyone!  I have a little project for you today that will sweeten anyones day!  On Valentines Day, we always like to make a special dinner for the kids.  We make chocolate waffles with raspberry syrup.  It's something my kids look forward to every year.  And lets face it, who doesn't love breakfast for dinner?


I made these little pockets last year for our Valentines dinner, which I slipped a little note to tell them all the reasons I loved them.  But this year, I am going to put them out early so I can fill them with notes all  month long.  After I made them, I tied them to the backs of their chairs a the table.  They made my table look so festive, and how fun is it to get love notes every day!

I used
Echo Parks Be Mine collection found here
Lori's heart pocket file found here
added some bakers twine to tie them to the chair


Tuesday, January 8, 2013

Warm up this Winter

Hello - man is it cold outside.  I am such hermit when it is cold outside, it's got to be important for me to head out in the cold.

I also am also always looking for gift to say thanks, so when I saw this cute snowman file at Lori's shop, I just had to make one.  I used Lori's Winter Park collection from Echo Park, which is a great collection for those frosty projects.  I also used her Snowman tote file, found here, to make this cute little bag, just perfect filled with some warm hot chocolate and homemade marshmallows.  Then I added a quick tag with ribbon and twine.  This would warm up anyones day!


Thanks for stopping by, see ya next tuesday!

Friday, December 7, 2012

Christmas Crackers

Heres a quick little project to share that will make your Christmas dinner fun and exciting.  I love these crackers, they were quick and fun to make!

I used the random Christmas paper, the cracker or candy shape box, and the ticket tag label, both found at Lori's shop.  After cutting them, I filled them with candies, tied them with twine, and put the tag on.  The names were simply printed on address labels, for easy peal and stick.  Then I added some stickers, and it was easy as that.  I placed each cracker on the plate, so they acted like a name card, but also a treat and a surprise for each guest.  What a fun Christmas tradition!


Thanks for stopping by...

Tuesday, October 23, 2012

Happy Halloween

 I love Halloween, I love to colors, the fun crazy themes, and all the candy that goes with it.  I most love to decorate for Halloween.  So today, not only do I have one, but two projects for you.

The first project I have is this darling banner.  I was so happy to see this in Lori's shop, because I had the perfect spot to put it in.  I was very easy to put together, All the parts are included in the file.  I used K & Co. Halloween paper pack and coordinating chipboard shape.  The banner file can be found in Lori's store here.


How cute are these potion bottles.  I couldn't stop with just one, I had to make all five.  I used My Mind's Eye's Halloween paper, black and orange card stock, and various ribbons and fibers.  You can find all five potion bottles in Lori's shop here:

spider legs tin
witches hazel bottle
eyes of newt
ground bat wings
warlock root bottle


Happy Halloween everyone!
Related Posts Plugin for WordPress, Blogger...